Building a Sample-Accurate Metronome with AudioTrack in Android
In the world of audio applications, timing precision is crucial. A metronome is a perfect example of an app that requires accurate timing to produce rhythmic beats consistently. In this article, we’ll explore how to build a sample-accurate metronome in Android using AudioTrack instead of relying on delay(), and how to generate waveforms programmatically.
Why Not Use Delay?
When building a metronome, it’s tempting to use delay() or Handler.postDelayed() to schedule beats. However, these approaches depend on the system clock, which is susceptible to timing drift due to CPU scheduling, garbage collection, and other OS activities. This can result in inconsistent beat timing, especially noticeable over extended periods.
Instead, a more robust solution is to use AudioTrack with PCM frame counting, achieving precision down to the sample level. This approach leverages the sample rate to schedule beats with sub-millisecond accuracy, eliminating jitter and timing drift.
Understanding AudioTrack and PCM
AudioTrack is a low-level API that allows developers to write raw PCM audio data to a playback buffer. PCM (Pulse Code Modulation) data represents audio as a series of samples, where each sample is a discrete amplitude value.
For our metronome, we will generate these samples programmatically using sinusoidal waveforms. This allows us to synthesize metronome clicks at precise intervals, ensuring consistent beat timing.
Implementing a Sample-Accurate Metronome
Instead of using delay() to schedule beats, we calculate the number of frames per beat based on the BPM and sample rate. We then count frames to determine when each beat should occur, ensuring precise timing without relying on the system clock.
Here’s a brief overview of the implementation steps:
- Initialize
AudioTrackin streaming mode. - Generate a waveform buffer with a ticking sound.
- Calculate frames per beat based on BPM and sample rate.
- Stream click and silence buffers to
AudioTrackmaintain beat consistency.
Setting Up AudioTrack
First, we initialize the AudioTrack object in streaming mode, allowing us to write audio data dynamically:
private  fun initAudioTrack(sampleRate: Int, bufferSize: Int): AudioTrack {
	return AudioTrack(
		AudioManager.STREAM_MUSIC,
		sampleRate,
		AudioFormat.CHANNEL_OUT_MONO,
		AudioFormat.ENCODING_PCM_16BIT,
		bufferSize,
		AudioTrack.MODE_STREAM
	).apply { play() }
}
Generating Waveforms in Android
To generate waveforms, we calculate each sample as a function of time, frequency, and amplitude. A simple sine wave formula is:
fun generateSample(position: Int, amplitude: Float, frequency: Double, sampleRate: Int): Double {
	return sin(2 * Math.PI * frequency * position / sampleRate) * amplitude
}
We can then fill an audio buffer with these samples to create a click sound. Additionally, we can implement fade-in and fade-out effects to smooth the edges of the waveform and prevent clicking artifacts.
Let’s break the formula down:
-
sin(x) — helps to make a sinusoid with predefined frequency. Let’s suppose we use a sample rate (“number of points on the sinusoid”) of 44100 Hz. Then we can have an array of 44100 short values along the way.
-
We want to make the first beat accent, then we use variable volume, suppose 1.0f for the accent and 0.7f for the regular beat.

- As sin(x) returns values in the range -1.0..1.0, we should multiply the value by Short.MAX_VALUE to provide an amplitude of a signal respecting our config (AudioFormat.ENCODING_PCM_16BIT, that corresponds to a Short value (2 bytes))
This waveform will be the same for any beat rate. So, we can cache it. The only thing that will change is the silence interval. We will discuss how to calculate in another chapter.
Then, we generate a sinusoidal waveform to represent the metronome click sound. The waveform is created using a simple sine wave function:
private fun generateClickSound(frequency: Double, durationSec: Float, volume: Float, sampleRate: Int): ShortArray {
    val numSamples = (sampleRate * durationSec).toInt()
    val amplitude = volume * Short.MAX_VALUE

    return ShortArray(numSamples) { i ->
        val sample generateSample(position, amplitude, sampleRate)
        sample.toInt().toShort()
    }
}
Implementing Frame-Based Timing
Now, we calculate the frames per beat to ensure precise timing:
private  fun calculateFramesPerBeat(bpm: Int, sampleRate: Int): Int {
	val secondsPerBeat = 60f / bpm
	return (sampleRate * secondsPerBeat).toInt()
}
So, knowing a bpm value (beats per minute, suppose it is 60, meaning 1 beat per second) and a sample rate (44100 Hz, meaning 44100 samples per second), we can calculate the number of frames needed per beat:
framesPerBeat = (60 seconds / 60 beats per minute) * 44100 = 44100
Writing Audio Data with Frame Counting
Instead of using delay(), we write audio data at precise frame intervals. Let’s check the sample code:
val audioTrack = initAudioTrack(sampleRate, bufferSize)

val framesPerBeat = calculateFramesPerBeat(bpm, sampleRate)
val silenceFrames = framesPerBeat - (sampleRate * durationSec).toInt()

val silenceBuffer = ShortArray(silenceFrames)

while (isActive) {
	val clickSound = if(isAccentBeat()) accentWaveform else regularWaveform

	audioTrack.write(clickSound, 0, clickSound.size)
	audioTrack.write(silenceBuffer, 0, silenceBuffer.size)
}
In this approach, the silenceBuffer serves as the gap between beats, ensuring that the click sound plays precisely on each beat without relying on time-based delays. It’s just a ShortArray of zeroes.
One beat consists of a click sound (takes durationSec = 0.2 seconds) and a silence interval between the next click.
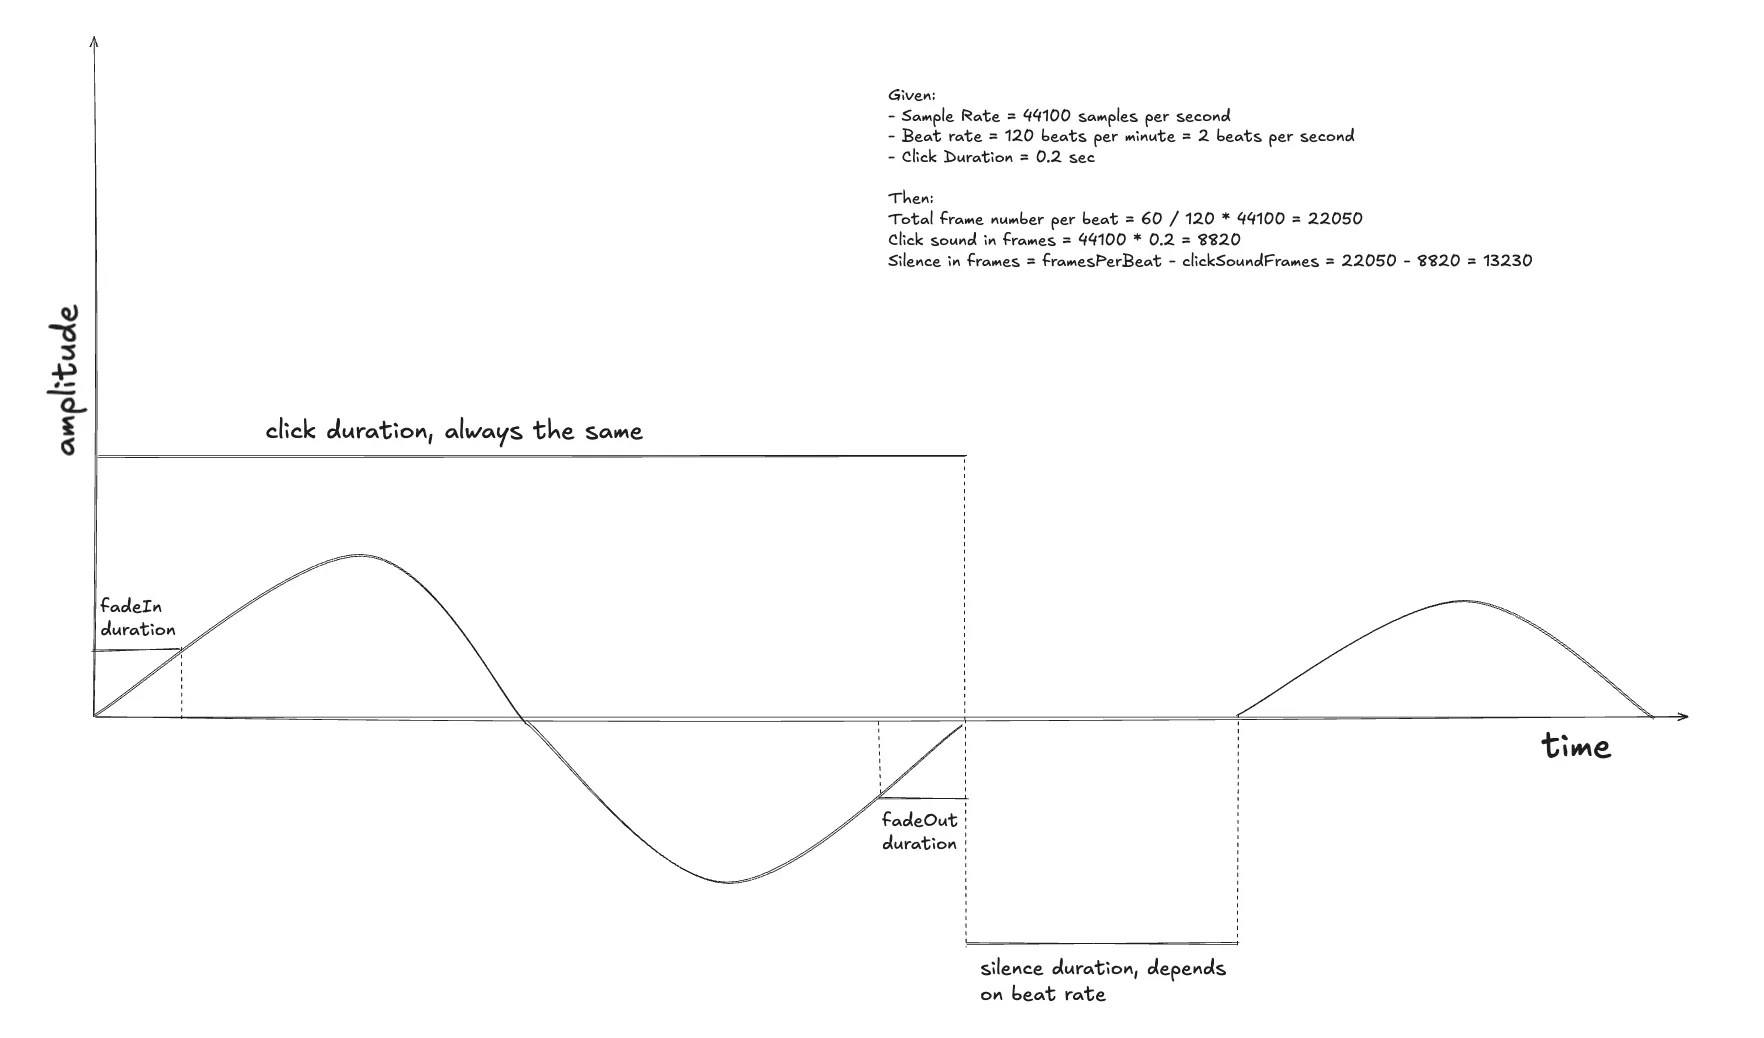
So, from the previous step we have:
framesPerBeat = (60 / 60) * 44100 = 44100
clickSoundFrames = sampleRate * durationSec = 44100 * 0.2 = 8820
silenceFrames = framesPerBeat - clickSoundFrames = 35280
That means clickSoundFrames is always the same but silenceFrames depend on beats per minute
We can think of ways to cache the silence array but it’s not the purpose of this article. We’re aiming to show the general idea.
Adding Fade-In and Fade-Out
To prevent audio clicks and smooth out transitions, we implement fade-in and fade-out effects:
val numSamples = (sampleRate * durationSec).toInt()
val fadeInSamples = (sampleRate * fadeInDurationSec).toInt()
val fadeOutSamples = (sampleRate * fadeOutDurationSec).toInt()
val fadeOutStartIndex = numSamples - fadeOutSamples

return ShortArray(numSamples) { position ->
	val baseSample = sin(twoPi * frequency * position / sampleRate) * volume * Short.MAX_VALUE

	val fadeInMultiplier = if (position < fadeInSamples) {
		position.toFloat() / fadeInSamples
	} else  1.0f

	val fadeOutMultiplier = if (position >= fadeOutStartIndex) {
		(numSamples - position - 1).toFloat() / fadeOutSamples
	} else  1.0f

	(baseSample * fadeInMultiplier * fadeOutMultiplier).toInt().toShort()
}
The idea is to specify needed fadeIn and fadeOut durations, knowing that we can understand the number of frames it affects and linearly multiply the sample by the fade multiplier.
- Fade-In Calculation: For the first
fadeInSamplesframes, the volume scales linearly from0.0to1.0. - Fade-Out Calculation: For the last
fadeOutSamplesframes, the volume decreases linearly from1.0to0.0.
Summary
Using frame counting and AudioTrack provides precise, consistent metronome timing without relying on system clocks. By calculating frames per beat and streaming audio data at those exact frames, we achieve sample-level accuracy that ensures perfect beat timing over extended periods.